Choosing the right graph is crucial for effectively presenting data in your science fair project. In this article, we will explore why selecting the right graph matters, different types of graphs to consider, how to choose the best graph for your data, and tips for creating effective graphs. By following these guidelines, you can ensure that your data is accurately and clearly represented, making your science fair project stand out.
Key Takeaways
- Understanding the purpose of your project is essential in choosing the right graph.
- Identify the data you need to present and consider the audience and context.
- Different types of graphs, such as bar graphs, line graphs, pie charts, scatter plots, and histograms, serve different purposes.
- Match data types to graph types and highlight key findings with the right graph.
- Consider the complexity of your data and ensure clarity and readability in your graphs.
Why Choosing Graph Type Matters

Understanding the Purpose of Presenting Data Visually
When starting your science fair project, it’s important to understand the purpose behind it. Are you trying to compare different things, show a trend, or visualize proportions? Knowing the purpose will help you choose the best graph to present your data.
If your project involves structured, quantitative data, you can use a table to present your findings. Make sure the table is concise and formatted correctly in Markdown.
On the other hand, if your project involves less structured content, like steps or qualitative points, you can use a bulleted or numbered list. This will help organize your information in a clear and easy-to-follow manner.
Remember, the goal is to make your graph easy to understand for your audience. So choose the right format and present your data in a way that tells a compelling story!
Identifying the Data You Need to Present
When it comes to identifying the data you need to present for your science fair project, it’s important to consider what information is most relevant and important to your project. Think about the key findings or results that you want to showcase to your audience.
To present structured, quantitative data, you can use a table. A table is a great way to organize and display numerical information in a clear and concise manner. Make sure to format the table correctly in Markdown.
On the other hand, if your data is less structured or consists of qualitative points or a series of related items, you can use a bulleted or numbered list. This will help you present the information in a more organized and easy-to-read format.
Remember, the goal is to present your data in a way that is clear and understandable to your audience. So choose the format that best suits your data and helps convey your findings effectively.
Considering the Audience and Context
When choosing the best graph for your science fair project, it’s important to consider your audience and the context in which you will be presenting your data. Think about who your audience is and what information they need to understand. Are they fellow students, teachers, or judges? What are they interested in and what concerns might they have?
To ensure clarity and readability, it’s important to format your graph in a way that is easy to understand. You can use bold to highlight important keywords and italics for subtle emphasis. If your data is structured and quantitative, consider using a Markdown table to present it. Make sure the table is succinct and formatted correctly.
If your data is less structured, like a series of steps or qualitative points, you can use a bulleted or numbered list. This will help organize your information and make it easier for your audience to follow.
Remember, when presenting your graph, it’s important to show the whole picture. Consider looking at your question from different points of view to provide all the necessary information for your audience to make an informed decision.
Lastly, keep in mind the medium in which you will be presenting your graph. If it’s a live presentation, you can have fewer comments on the graph since you can provide the necessary context through your spoken words. However, if you’re sending your graph via email or Slack, it’s better to provide all the details in the graph itself.
By considering your audience and the context, formatting your graph effectively, and providing the necessary information, you can choose the best graph for your science fair project and effectively communicate your findings.
Exploring Different Types of Graphs

Bar Graphs: Perfect for Comparing Categories
When it comes to comparing different categories, bar graphs are the way to go! Bar graphs are a great tool for visualizing and comparing data in a fun and easy-to-understand way. Here are some tips to help you create an awesome bar graph for your science fair project:
- Order your categories: It’s a good idea to order your categories in descending order to make it easier to interpret the graph.
- Use a table for structured data: If you have structured, quantitative data, consider using a table to present it. Make sure the table is succinct and formatted correctly in Markdown.
- Consider a stacked bar chart: Sometimes, it’s easier to compare the structure of different categories using a stacked bar chart. This can be especially useful when looking at the share of customers by age in different regions.
Remember, the goal is to make your graph easy to read and understand. So, get creative and have fun with your bar graph!
Line Graphs: Showing Trends and Patterns
When you want to show how something changes over time, a line graph is the perfect choice! Line graphs are great for visualizing trends and patterns in your data. They are especially useful when you have ordered variables on both the X- and Y-axes.
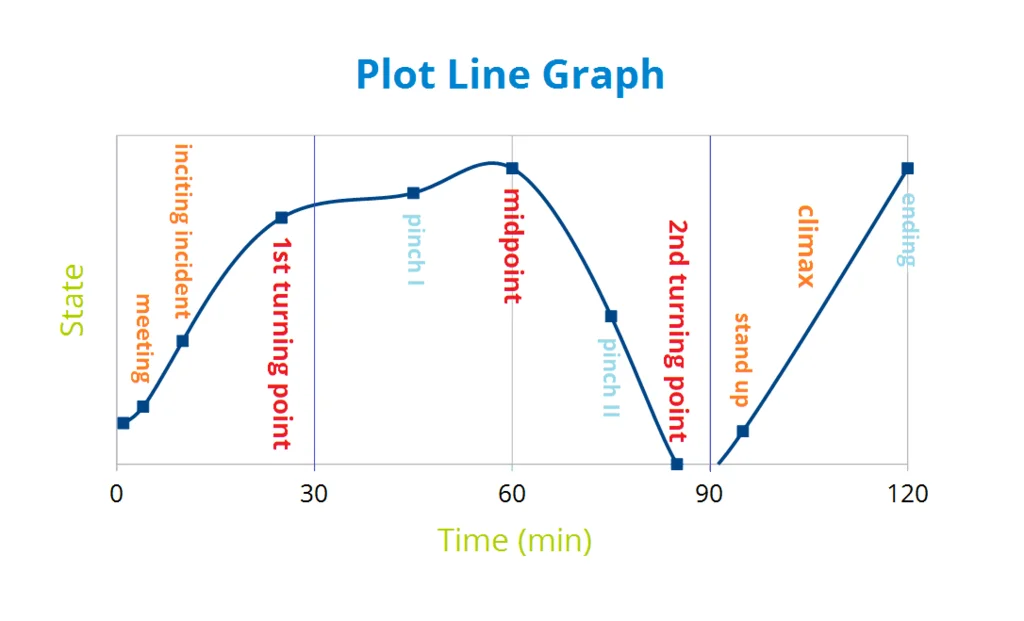
To create a line graph, you can use a simple table to organize your data. Make sure to label the X-axis with the time periods and the Y-axis with the values you are measuring. Then, plot the points on the graph and connect them with a line. Voila! You have a line graph that shows the progression of your data over time.
If you’re not sure how to interpret the data on a line graph, don’t worry! Just remember that the line represents the change in the values over time. If the line goes up, it means the values are increasing. If the line goes down, it means the values are decreasing. And if the line stays relatively flat, it means the values are staying the same.
Here’s a quick example to help you understand. Let’s say you’re tracking the temperature in your city over the course of a week. You can create a line graph with the days of the week on the X-axis and the temperature on the Y-axis. As you plot the temperature for each day and connect the points, you’ll see a line that shows how the temperature changes throughout the week.
So remember, when you want to show trends and patterns over time, grab a line graph and start plotting your data!
Pie Charts: Visualizing Proportions
When it comes to visualizing proportions, pie charts are the perfect tool! Pie charts are a fun and colorful way to show how different parts make up a whole. They are especially useful when you want to compare the sizes of different categories or parts.
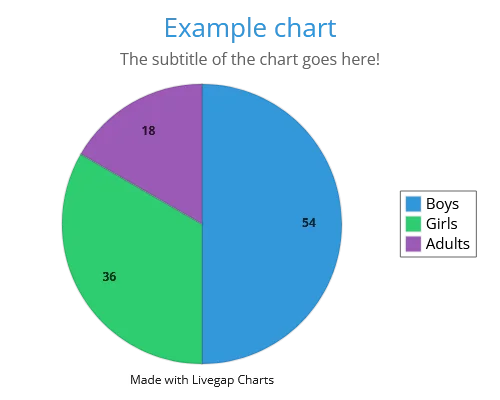
To create a pie chart, you can use a Markdown table to present your data in a structured and quantitative way. Make sure to keep it succinct and format it correctly in Markdown. Each category or part should be represented by a slice of the pie, with the size of the slice corresponding to the proportion it represents.
If your information is less structured or you want to present a series of related items, you can use a bulleted or numbered list. This is a great option for steps, qualitative points, or a series of related ideas.
Remember, the goal is to make your graph easy to understand and visually appealing. So, get creative with colors and formatting, but make sure it’s still clear and readable. Happy graphing!
Scatter Plots: Examining Relationships
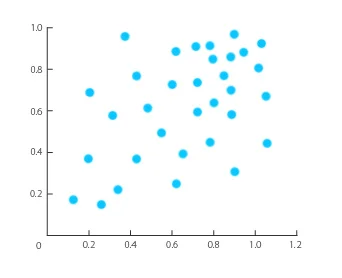
When it comes to examining relationships between two variables, scatter plots are the way to go! Scatter plots are a great tool for visualizing how one variable changes with another. They are especially useful when you want to see if there is a correlation between the values.
To create a scatter plot, you can use Plotly Graphical objects. This allows you to customize the graph to your liking. If you have a lot of data points and they start to overlap, reducing the opacity of the points can help reveal the relationship.
For example, take a look at the two graphs below. The second graph, with reduced opacity, gives a better understanding of the data distribution.
- Graph with overlapping points
- Graph with reduced opacity
Remember, scatter plots are all about examining relationships, so make sure to add a trend line to highlight the correlation between the variables.
Now that you know how to create a scatter plot, go ahead and use this graph type to analyze the relationship between your data points in your science fair project. Have fun exploring the connections between variables and discovering new insights!
Histograms: Analyzing Data Distribution
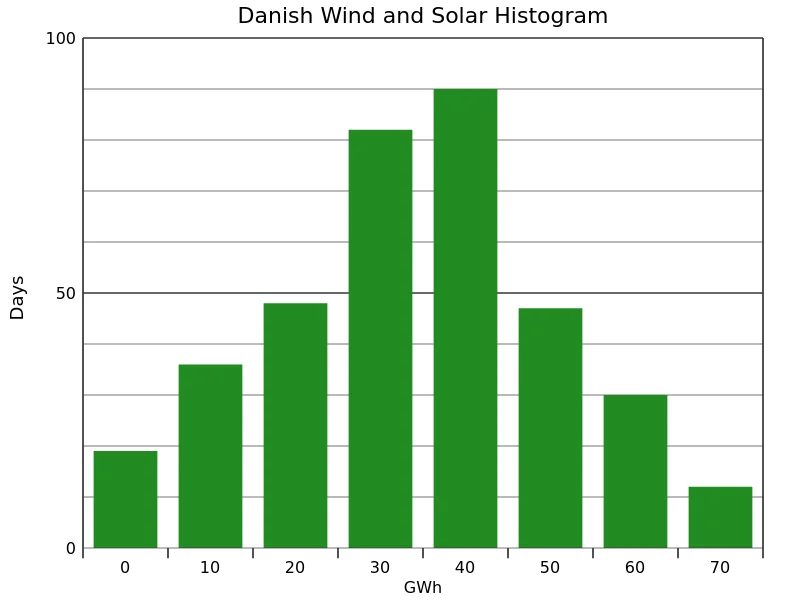
A histogram is a graphical method for displaying the shape of a distribution. It is particularly useful when there are a large number of observations. The goal is to understand how value is distributed: Is it normally distributed? Is it unimodal? Do we have any outliers in our data?
To create a histogram, follow these steps:
- Create a frequency table to organize your data.
- Determine the appropriate number of intervals (or bins) to divide your data into.
- Plot the intervals on the x-axis and the frequency (or proportion) on the y-axis.
- Draw vertical bars to represent the frequency (or proportion) of each interval.
Remember to choose the appropriate bin width to accurately represent your data. If you have a large range of values, you may need to adjust the bin width to capture the important details.
Here’s an example of a frequency table for the scores of 642 students on a psychology test:
| Score Range | Frequency |
|---|---|
| 0-50 | 10 |
| 51-100 | 50 |
| 101-150 | 200 |
| 151-200 | 382 |
By creating a histogram, you can easily visualize the distribution of scores and identify any patterns or outliers. Remember, histograms are a great tool for analyzing data distribution and can provide valuable insights for your science fair project.
Choosing the Best Graph for Your Data

Matching Data Types to Graph Types
When it comes to choosing the best graph for your data, it’s important to consider the type of data you have. Different types of data are best represented by different types of graphs. Let’s take a look at some common data types and the corresponding graph types:
- Structured, quantitative data: For presenting structured, quantitative data, you can use a table. Tables are a great way to organize and display numerical information in a clear and concise manner. Make sure to format your table correctly using Markdown.
- Less structured content: If your data is less structured, like steps, qualitative points, or a series of related items, you can use a bulleted or numbered list. Lists are a simple and effective way to present information in a concise and easy-to-read format.
Remember, the goal is to choose a graph type that best represents your data and makes it easy for your audience to understand. So, take some time to think about the type of data you have and choose the graph type that will showcase it best.
Tip: Don’t forget to format your important keywords in bold and use italics for subtle emphasis where needed.
Highlighting Key Findings with the Right Graph
When it comes to highlighting key findings in your data, choosing the right graph can make all the difference. By selecting the appropriate graph type, you can effectively communicate your results to others. Here are some tips to help you choose the best graph for your data:
- Bar Graphs: Perfect for comparing categories, such as different treatments or variables.
- Line Graphs: Ideal for showing trends and patterns over time.
- Pie Charts: Great for visualizing proportions or percentages.
- Scatter Plots: Useful for examining relationships between variables.
- Histograms: Helpful for analyzing the distribution of data.
Remember to format important keywords in bold and use italics for subtle emphasis. You can use a table to present structured, quantitative data, or a bulleted or numbered list for less structured content. And don’t forget to keep your graphs clear and readable by avoiding unnecessary elements. Happy graphing!
Considering the Complexity of Your Data
When it comes to graphing complex data, it’s important to keep a few things in mind. First, remember to start simple and then add complexity only when it is actually needed. Sometimes, we may think that complex problems require complicated graphs, but studies have shown that simplification usually produces more precise models. So, don’t be afraid to keep it simple!
If your data is structured and quantitative, consider using a table to present it. Tables are a great way to organize and display data in a clear and concise manner. Just make sure to format the table correctly using Markdown.
On the other hand, if your data is less structured or consists of qualitative points, a bulleted or numbered list can be a useful tool. Lists are perfect for presenting steps, points, or a series of related items. They are easy to read and understand, making them ideal for kids in grade school through high school.
Remember, the goal is to make your graph easy to understand and interpret. So, keep it simple, use the right format for your data, and let your creativity shine!
Ensuring Clarity and Readability
When creating graphs for your science fair project, it’s important to ensure clarity and readability. Here are some tips to help you present your data effectively:
- Format at most one important keyword in bold and use italics for subtle emphasis where needed.
- Avoid including the H3 heading in your paragraph.
- If you have structured, quantitative data, consider using a Markdown table to present it. Make sure the table is succinct and formatted correctly.
- For less structured content, like steps or qualitative points, use a bulleted or numbered list.
Remember, the goal is to make your graph easy to understand for your audience. So, choose the right formatting and organization that best suits your data. Good luck with your science fair project!
Tips for Creating Effective Graphs
Selecting Appropriate Labels and Titles
When creating graphs for your science fair project, it’s important to select appropriate labels and titles to ensure clarity and understanding. Here are some tips to help you:
- Format at most one important keyword in bold and use italics for subtle emphasis where needed.
- Do not include the H3 heading in the paragraph.
- If you have structured, quantitative data, consider using a Markdown table to present it. Make sure the table is succinct and formatted correctly in Markdown.
- For less structured content, like steps, qualitative points, or a series of related items, use a bulleted or numbered list.
- Optionally, you can include a Markdown blockquote for important tips or advice.
Remember, the goal is to make your graph easy to read and understand, so choose labels and titles that are clear and concise. Happy graphing!
Using Colors and Symbols Wisely
When it comes to using colors and symbols in your graphs, it’s important to keep a few things in mind. First, bold formatting can be used to highlight important keywords or data points that you want to draw attention to. This can help make your graph more visually appealing and easier to understand. Additionally, italics can be used for subtle emphasis where needed.
If you have structured, quantitative data that you want to present, consider using a Markdown table. Tables can help organize your data in a clear and concise manner. Just make sure to format the table correctly in Markdown.
On the other hand, if you have less structured content, like steps, qualitative points, or a series of related items, a bulleted or numbered list can be a great choice. Lists are easy to read and can help break down information into smaller, digestible chunks.
Remember, the goal is to create graphs that are easy for kids in grade school through high school to understand. So, keep the instructions simple and straightforward. Happy graphing!
Adding Clear and Informative Legends
When creating a graph, it’s important to add clear and informative legends. Legends help the reader understand what each color or symbol represents in the graph. To create a legend, follow these steps:
- Identify the different categories or variables in your graph.
- Assign a unique color or symbol to each category or variable.
- Create a table to present the categories or variables along with their corresponding colors or symbols.
Here’s an example of how a legend table could look like:
| Category | Color |
|---|---|
| A | Blue |
| B | Red |
| C | Green |
By including a clear and informative legend, you’ll make it easier for others to understand your graph and interpret the data accurately.
Avoiding Chartjunk and Unnecessary Elements
When creating graphs for your science fair project, it’s important to avoid cluttering your charts with unnecessary elements. Focus on the key information and keep the design clean and simple. Here are some tips to help you create effective graphs:
- Simplify your labels and titles: Use clear and concise labels and titles that accurately describe the data you are presenting.
- Use colors and symbols wisely: Choose colors that are easy to distinguish and use symbols sparingly to highlight important data points.
- Add clear and informative legends: Include a legend to explain the meaning of different colors or symbols used in your graph.
- Avoid chartjunk: Don’t overcrowd your graph with unnecessary elements like excessive gridlines or decorative backgrounds.
Remember, the goal is to present your data in a clear and visually appealing way. By following these tips, you’ll be able to create graphs that effectively communicate your findings to your audience.
Conclusion
Choosing the best graph for your science fair project can make a big difference in how your data is presented and understood. Remember to consider the type of data you have and the story you want to tell. Whether it’s a bar chart, scatter plot, or stem and leaf display, each graph has its own strengths and weaknesses. Experiment with different visual encodings and see which one works best for your project. And most importantly, have fun with your science fair project and let your creativity shine!
Frequently Asked Questions
How important is it to choose the right graph for my science fair project?
Choosing the right graph is crucial for effectively presenting your data and conveying your findings to the audience. It helps in understanding the purpose of your project, identifying the data you need to present, and considering the audience and context.
What are the different types of graphs that I can use for my science fair project?
There are various types of graphs you can use, such as bar graphs for comparing categories, line graphs for showing trends and patterns, pie charts for visualizing proportions, scatter plots for examining relationships, and histograms for analyzing data distribution.
How do I choose the best graph for my data?
To choose the best graph for your data, you need to match data types to graph types, highlight key findings with the right graph, consider the complexity of your data, and ensure clarity and readability.
What are some tips for creating effective graphs?
Some tips for creating effective graphs include selecting appropriate labels and titles, using colors and symbols wisely, adding clear and informative legends, and avoiding unnecessary elements and chartjunk.
Should parents be involved in creating graphs for science fair projects?
Parents can be involved in creating graphs for science fair projects, especially for younger children. However, it is important to consider the abilities of the child and their frustration level. Parents can assist with typing and creating charts, but it is important to ensure that the project remains scientifically accurate and reflects the child’s work.
How many times should I do a science fair project?
It is generally recommended to do a science fair project once for an experiment. However, if you are interested in exploring different aspects or variations of the project, you can conduct multiple experiments and document them in your project.